Vinyl siding is a reliable and cost-effective option for many homes, but there comes a time when it needs to be removed, whether for repairs, upgrades, inspections, or to replace damaged sections. For homeowners and DIY renovators, learning how to remove vinyl siding can seem intimidating. But with the right tools, techniques, and safety precautions, it’s a manageable project that you can take on confidently.
This comprehensive guide walks you through everything: from siding removal tips and tools to special considerations around windows and doors, and when it’s best to call a professional. Whether you’re tackling a small repair or prepping for a full replacement, you’re in the right place.
Tools and Materials You’ll Need
Removing vinyl siding safely and effectively starts with the right tools. Here’s a list of essentials to gather before you begin:
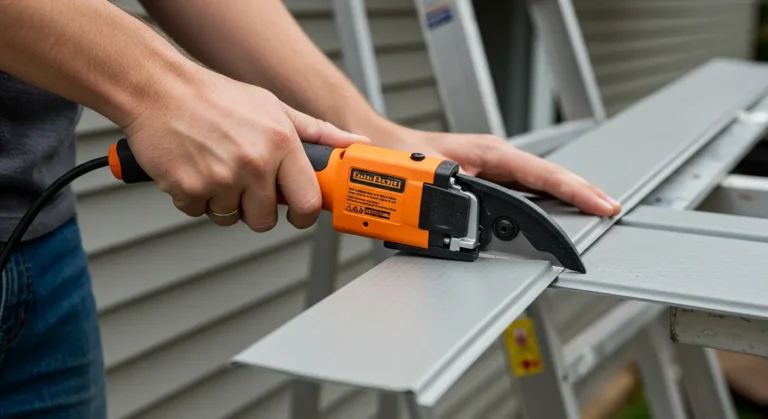
- Siding removal tool (zip tool) – This is the key to unlocking interlocked panels without damage.
- Utility knife – Useful for cutting caulk or trimming small pieces.
- Work gloves – Protects your hands from cuts and abrasions.
- Ladder – Necessary for reaching higher sections or second stories.
- Pry bar (optional) – Helpful for removing nails or stubborn trim.
- Safety glasses – Essential for eye protection from falling debris or dust.
Pro tip: Zip tools are inexpensive and can be found at most hardware stores. Don’t attempt removal without one; it’s a game-changer.
Reasons You Might Need to Remove Vinyl Siding
Homeowners may need to remove vinyl siding for various reasons. Here are the most common:
- Repairs – Fixing cracked, loose, or warped panels. Learn more about common vinyl siding repair techniques.
- Inspections – Checking for mold, moisture, or insulation issues behind the siding.
- Upgrades – Installing new siding or adding insulation.
- Painting – Prepping for a fresh coat if you’re considering painting your vinyl siding.
- Pest Control – Investigating possible termite or ant infestation.
- Window/Door Replacement – Removing siding around frames for proper installation.
Whatever your reason, the steps remain largely the same, and you’ll gain valuable insight into your home’s exterior condition.
Step-by-Step Instructions for Removing Vinyl Siding
Follow these steps carefully for efficient and damage-free siding removal.
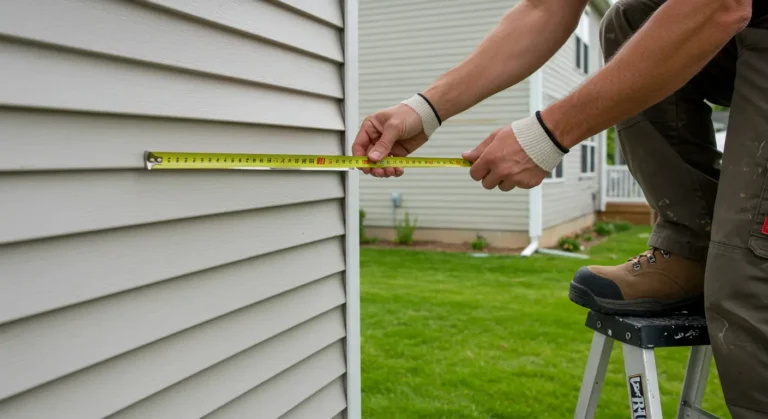
1. Inspect the Area
Start by determining which section of siding needs to be removed. Look for physical signs like bulging, discoloration, or cracks. If your project is repair-related, limit removal to the smallest area possible.
2. Locate the Seam and Use the Zip Tool
Vinyl siding panels interlock at the bottom edge. Slide your zip tool under the seam where the two panels meet. Hook the edge of the upper panel and gently pull it downward and outward to release the lock.
3. Unhook the Panel
Once unlocked, lift and unhook the vinyl panel from the one below. If it resists, check for nails or fasteners that may still be holding it in place.
4. Remove Nails or Fasteners
Use your pry bar or claw hammer to remove the nails securing the panel to the wall. Work slowly to avoid bending or cracking the panel, especially if you plan to reuse it.
5. Repeat the Process
Continue panel by panel until the section you need is fully removed. Keep track of each piece if you’ll be reinstalling it later.
6. How to Remove Bottom Piece of Vinyl Siding
If you’re working near the ground level, you’ll likely need to remove the bottom piece of vinyl siding. This section is usually connected to the starter strip along the foundation, making it more difficult to unhook.
Carefully insert your zip tool or a flat pry tool under the bottom edge. Release the lock gently and pull the panel outward. Avoid forcing it, as lower pieces tend to be more brittle and may crack if handled roughly.
Tip: Removing bottom siding may expose your home’s starter strip or sheathing. Take note of any signs of water damage or wear while it’s uncovered.
For a visual reference, see this Family Handyman siding removal guide.
Planning to reinstall the panels? Check out our step-by-step guide on how to install vinyl siding properly and securely.
Tips for Avoiding Damage During Removal
Vinyl siding is tough, but not indestructible. Follow these siding removal tips to minimize breakage and reduce reinstallation headaches:
- Work top-down when possible – It reduces stress on underlying panels.
- Don’t rush the zip tool – A rushed or angled pull can crack panels.
- Watch out for hidden nails – Especially near corners and around windows.
- Avoid cold-weather removals – Vinyl is more brittle in low temperatures.
- Label panels if reinstalling – Use masking tape on the back to indicate order.
Special Considerations for Windows, Doors, and Corners
Removing vinyl siding around windows and doors requires extra care due to the presence of trim, flashing, and caulking. Here’s how to do it safely:
- Score any caulk lines with a utility knife before pulling panels.
- Use the zip tool gently around J-channels: these framing pieces hold the siding tightly.
- Check for flashing: metal or plastic components that protect against water intrusion.
- Be cautious around soffits and fascia: they’re connected to the roofline and are easily damaged.
Note: Improper removal near windows may lead to leaks or reinstallation issues. For more expert advice on working with different siding layouts, refer to this guide from This Old House – siding info.
What to Check After Siding Is Removed
With the siding off, you have an opportunity to inspect your home’s envelope for potential issues:
- Moisture Damage – Look for mold, mildew, or wood rot.
- Insulation Condition – Check for gaps, compression, or wet insulation.
- Sheathing Problems – Warped, cracked, or decaying sheathing should be replaced.
- Pests or Insects – Signs include tunnels, droppings, or shredded material.
- Loose Wiring or Fixtures – Secure any exposed utilities before reinstalling panels.
These checks can save you time, money, and future headaches.
When to Call a Professional
While many homeowners can handle minor siding removal themselves, there are situations where hiring a pro is safer and more effective:
- Large-Scale Damage – When an entire wall or side of the house is affected.
- High-Rise Work – Removing siding on upper levels or steep elevations.
- Suspected Structural Issues – Sagging, mold, or compromised sheathing.
- Upgrades or Full Replacement – When you’re ready for new siding and want it done right.
Not sure how extensive the issue is? Book a Free Siding Inspection Today to get a professional opinion before making repairs.
Conclusion
Learning how to remove vinyl siding gives you more control over your home’s maintenance and repair needs. Whether it’s a small fix or the beginning of a full upgrade, understanding this process can help you avoid costly mistakes and spot problems early.
Take your time, use the right tools, and don’t hesitate to call in a pro if you encounter structural or large-scale issues. Either way, you’re making a smart investment in your home’s longevity and value.
Ready to take the next step? Book a Free Siding Inspection Today and get expert advice tailored to your home.
FAQ: Common Questions About Removing Vinyl Siding
Can I remove vinyl siding myself?
Yes, most homeowners can safely remove vinyl siding for small projects with the right tools. However, larger jobs or areas with complex trim may require professional assistance.
What tools do I need to remove vinyl siding?
You’ll need a zip tool, utility knife, ladder, gloves, and safety glasses. Optional tools include a pry bar and screwdriver depending on your home’s construction.
Do I need to take off all the siding to make repairs?
Not always. You can typically remove vinyl siding panels only in the affected area. However, for deep inspections or extensive repairs, more panels may need to come off.
How do I remove vinyl siding around windows and doors?
Use a utility knife to score the caulk and a zip tool to release panels around windows and doors. Take extra care not to damage J-channels or flashing.